Friday, 20 April 2012

Final Hand-In- RENDERS

As promised, here are the final render sheets for all of my main deliverables for Ken this year. This includes updated versions of the organic and inorganic models, along with their alternate textures. Look at my previous posts if you want to see the work in progress. So, yeah... here they all are. Enjoy!
Semester 1- Inorganic- Metal Gear Rex

 Semester 1- Inorganic- Metal Gear Rex (Damaged ver.)
Semester 1- Organic- Starship Trooper Arachnid
 Semester 1- Organic- Starship Troopers Arachnid (Alt Skin)
 Semester 2- Character- Goddess
Semester 2- Asset 1- Goddess Shrine
Semester 2- Asset 2- Mine Cart & Tracks
Semester 2- Asset 3- Mine Entrance
 Semester 2- Asset 4- Log Cabin

And that about wraps it up. Overall, I'd say I've done pretty well this year. I've definitely learned a lot (especially considering that I knew nothing about 3d Modelling before then) so I can't complain there. I will admit that I haven't updated this blog NEARLY as much as I should have though; I usually had something else I had to do and when I did find time I would usually forget all about it. Otherwise, this year's gone pretty smoothly, so.... yeah, that pretty much brings this thing to a close.
This is Sean Gannon, signing out...

Thursday, 19 April 2012

3D-Semester2-Asset 4-Log Cabin

This is the last of four assets that Ken asked us to deliver for this semester. As with the character before it, this object originates from a game prototype we were developing alongside this module.
The final model is the Log Cabin, a crumbling, snow-covered shack that would appear in the background of the fourth and final level, which was a snowy mountain. Unfortunately, the level itself was cut from the final game due to time constraints, so this model was never actually used. i was, however, able to complete it. This is the design sheet:-


I began the model itself late into the module. Most of it was constructed using cylinders, as can be seen below.
From there, I was able to finish the model fairly quickly. I also modelled a layer of snow on top of the cabin's roof, as I found that using texturing to simulate this did not produce the desired effect ( due to the ridges in the roof). I have to say, this was personally my favorite model out of the four, mainly due to how much better it looks compared to the others
Cabin w/o Texture
Cabin w/ Texture 
Cabin w/ Texture & Snow added
Once again, I'll add the final renders for this and all the other models later, including Metal Gear Rex and the Starship Troopers Ararchnid. May also include some kind of evaluation; dunno yet, depends what Ken wants from us...

3D-Semester2-Asset 3- Mine Entrance

This is the third of four assets that Ken asked us to deliver during our second semester. As with the character from before, these objects originated from a game prototype we were developing  alongside this module.
As with the Mine Cart, the Mine Entrance is a Diorama rather than a single Model, being composed  of a crane, several crates, barrels and signs and, of course, the boarded up mine shaft. This particular diorama was intended to form the end of the second level, with the player literally falling through it to get to the next level.
Not really much to say about the progression of this one; I pretty much just started working on it and moved on once it was finished. It should be noted, however, that many of the smaller models, such as the crates, were smaller assets that I imported in and were not made with this model.
The design sheet and images of the model can be found below:-
 Design Sheet
 Mine Entrance w/o Textures
Mine Entrance w/ Textures
Again, I'll post the final renders later. The last asset is the abandoned Log cabin

3D-Semester2-Asset 2- Mine Cart

This is the second of four assets that Ken asked us to deliver in semester 2. Like the character before it, this object originates from a game prototype we were developing at around the same time.
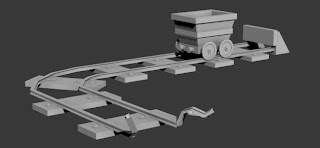
This is the Mine cart, complete  with all the different varieties of track that it would run on. This assets featured heavily in the third level of our game, which was set within a disused mine, though it did make some minor appearances in earlier levels.


I started work on this model at around the same time as the Goddess, so aside from some  minor adjustments and texturing, it was more or less done for some time. the only thing I have to say about this one is that I did make some small changes to the wheels that can be seen in the final model. Unfortunately, i neglected to save a copy of the file from before this change, so there are no images to show this progression. Sorry about that...
The design sheet and images can be seen below:-

Design Sheet
 Greyscale Model
Greyscale Model as Diorama 
 Textured Diorama
Textured Diorama w/ Rust added to texture 
Again, I'll add the final renders later. The next asset will be the Mine Entrance.

3D- Semester 2- Asset 1- Goddess Shrine

This is the first of four assets that Ken asked us to deliver in semester 2. Like the character before it, this object originates from a game prototype we were developing at around the same time.
This is the Goddess Shrine, an altar of worship for the character seen in the previous post. It's purpose in-game is a resting place for the game's MacGuffin, as well as the place where the Goddess herself would make her appearance.
Unlike the other assets, this one underwent a complete redesign. Originally, it was much simpler, looking more like a simple stone tablet with an altar. However, Ken felt this was too simplistic and asked that I either alter the object or choose another (as you can see I opted for the former). The original design and model can be seen below.

The new design featured a statue of the character, a more detailed altar and a small pool. It did more or less retain the colour scheme of its original design, however, though I chose to make it slightly darker. The design sheet and the model can be seen below:-
Design Sheet 
Model w/o texture 
Model w/ Texture
Again, I'll post the final renders later. The next asset will be the Mine cart.

3D- Semester2- Character- Goddess

For our second semester, Ken wanted us to create models for one character and four different assets. the catch was that they all had to come from the prototype video game we were working on for another module
For my character, I chose our game's antagonist, a female, hooded figure who we refered to simply as 'the Goddess'. The idea behind this character was that she was supposed to appear threatening and ominous, but would later be revealed to be benevolent after her mask was removed, showing the beatiful face underneath.
The designsheet for this model can be found below:-

 The Goddess was actually one of the first models that I made during this semester. I began work on it during week 2 and managed to get it into the following state:-

 It was left in that state for a good while, as we didn't actually need it until later and I had other things that i needed to do in the meantime.
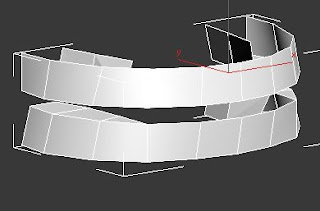
Eventually, however, I began working on it again. This time I began using edge loops to create a proper face for the modo to replace the blocky low poly head I had been using up until then. the result can be seen below:-

 This, along with the branches coming out of her shoulders, were the finishing touches to the model. Later on, I also managed to skin and animate the model. Some screencaps of this animation can be found below the model pictures


That's pretty much it for this model. I'll add the final renders soon.

Sunday, 15 April 2012

3D- Bipeds and Skinning

One of the last things Ken taught us this year was Bipeds and Skinning, two essential processes needed to animate models in 3D Studio Max.

The first process, the Biped, is basically a humanoid skeleton you can shape and manipulate to fit the proportions of your model. Its basically a template you can use to rig a character. Ken had us practice with this function using a model from his previous work. Some of you may recognise it as Muldoon, a minor villain from an old animated kids show called Butt Ugly Martians.

The Biped I created to fit the model

The model of Muldoon Ken gave us to practice

The model in Wireframe view with the Biped

The next step is Skinning. To put it in simple terms, Skinning is a modifier (similar to the Edit Poly Modifier  that you use to actually create a model) that attaches the biped to the model itself and that allows you to choose which parts of the model move with which parts of the Biped by controlling the weights of each of the model's vertices. To be honest, it is pretty hard to explain without going into detail and if I'm honest I'm not particularly fond of this process to begin with...
Regardless, I've included a sample of what Ken taught us with the image below, which shows an arm with some of the verts already weighted.


Now that I'm reaching the end of the year, I'm going to start posting some of the main deliverables that Ken has asked for this semester. These will include a character, who I have modelled, textured and animated, as well as four major assets. These models are all based on another project we have this year, which involves actually making a game, so the deliverables will reflect that. I will also try and post some of the other models I made for that project.

3D- Further Edge Loops Practice

Ok, I'll admit it; I haven't been updating this damn thing nearly as much as I should have. Ah well, I've got some catching up to do...

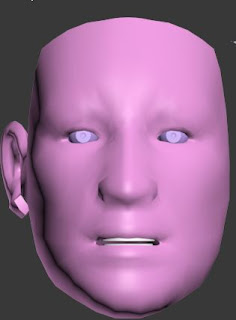
Remember the edge loops stuff I included in my last post? Well, this time we have more of that. Below you can see the finished face i was creating (minus the left ear and back of the head). As you can see, it now includes eyes, an ear, a throat and teeth.


Front view


Side View

Eyes (seperate from model)

Teeth (Seperate from model)

Ken has also been teaching us how to use edge loops to build other parts of the human body, including the hands, which you can see below. Sadly, I never got the chance to finish this one, as I had other commitments...

Palm

Top view


Ok, that's enough edge loops for now. Next post will be about Bipeds and Skinning!